Automate Chromatic with Azure Pipelines
Chromatic’s automation can be included as part of your multistage Azure Pipelines workflow with relative ease.
Setup
To integrate Chromatic with your existing pipeline, you’ll need to add the following:
trigger:
  - main

pool:
  vmImage: 'ubuntu-latest'

stages:
  - stage: UI_Tests
    displayName: "UI Tests"
    jobs:
      - job: Chromatic
        variables:
          npm_config_cache: $(Pipeline.Workspace)/.npm
        steps:
          - checkout: self
            displayName: "Get Full Git History"
            fetchDepth: 0
          - task: UseNode@1
            displayName: "Install Node.js"
            inputs:
              version: "24.20.0"
          - task: Cache@2
            displayName: "Install and cache dependencies"
            inputs:
              key: 'npm | "$(Agent.OS)" | package-lock.json'
              restoreKeys: |
                npm | "$(Agent.OS)"
              path: $(npm_config_cache)
          - script: npm ci
            condition: ne(variables.CACHE_RESTORED, 'true')
          - task: CmdLine@2
            displayName: "Run Chromatic"
            inputs:
              script: npx chromatic
            env:
CHROMATIC_PROJECT_TOKEN: $(CHROMATIC_PROJECT_TOKEN)trigger:
- main
pool:
vmImage: 'ubuntu-latest'
stages:
- stage: UI_Tests
displayName: "UI Tests"
jobs:
- job: Vitest
displayName: "Run Vitest"
container: mcr.microsoft.com/playwright:v1.63.0-noble
variables:
npm_config_cache: $(Pipeline.Workspace)/.npm
steps:
- checkout: self
displayName: "Get Full Git History"
fetchDepth: 0
- task: UseNode@1
displayName: "Install Node.js"
inputs:
version: "24.20.0"
- task: Cache@2
displayName: "Install and cache dependencies"
inputs:
key: 'npm | "$(Agent.OS)" | package-lock.json'
restoreKeys: |
npm | "$(Agent.OS)"
path: $(npm_config_cache)
- script: npm ci
condition: ne(variables.CACHE_RESTORED, 'true')
- task: CmdLine@2
displayName: "Run Vitest tests"
inputs:
script: npx vitest run
env:
CI: "true"
- task: PublishPipelineArtifact@1
inputs:
# Chromatic automatically defaults to the .vitest/chromatic directory.
# Replace with the path to your custom directory and adjust the CHROMATIC_ARCHIVE_LOCATION environment variable accordingly.
targetPath: .vitest/chromatic
artifact: chromatic-archives
publishLocation: "pipeline"
condition: succeededOrFailed()
- job: Chromatic
dependsOn: Vitest
displayName: "Run Chromatic"
variables:
npm_config_cache: $(Pipeline.Workspace)/.npm
steps:
- checkout: self
displayName: "Get Full Git History"
fetchDepth: 0
- task: UseNode@1
displayName: "Install Node.js"
inputs:
version: "24.20.0"
- task: Cache@2
displayName: "Install and cache dependencies"
inputs:
key: 'npm | "$(Agent.OS)" | package-lock.json'
restoreKeys: |
npm | "$(Agent.OS)"
path: $(npm_config_cache)
- script: npm ci
condition: ne(variables.CACHE_RESTORED, 'true')
- task: DownloadPipelineArtifact@2
inputs:
buildType: "current"
artifactName: "chromatic-archives"
targetPath: "$(System.DefaultWorkingDirectory)/.vitest/chromatic"
- task: CmdLine@2
displayName: "Run Chromatic"
inputs:
script: npx chromatic --vitest
env:
CHROMATIC_PROJECT_TOKEN: $(CHROMATIC_PROJECT_TOKEN)
CHROMATIC_ARCHIVE_LOCATION: ".vitest/chromatic"trigger:
- main
pool:
vmImage: 'ubuntu-latest'
stages:
- stage: UI_Tests
displayName: "UI Tests"
jobs:
- job: Playwright
displayName: "Run Playwright"
container: mcr.microsoft.com/playwright:v1.63.0-noble
variables:
npm_config_cache: $(Pipeline.Workspace)/.npm
steps:
- checkout: self
displayName: "Get Full Git History"
fetchDepth: 0
- task: UseNode@1
displayName: "Install Node.js"
inputs:
version: "24.20.0"
- task: Cache@2
displayName: "Install and cache dependencies"
inputs:
key: 'npm | "$(Agent.OS)" | package-lock.json'
restoreKeys: |
npm | "$(Agent.OS)"
path: $(npm_config_cache)
- script: npm ci
condition: ne(variables.CACHE_RESTORED, 'true')
- task: CmdLine@2
displayName: "Run Playwright tests"
inputs:
script: npx playwright test
env:
CI: "true"
- task: PublishPipelineArtifact@1
inputs:
# Chromatic automatically defaults to the test-results directory.
# Replace with the path to your custom directory and adjust the CHROMATIC_ARCHIVE_LOCATION environment variable accordingly.
targetPath: test-results
artifact: test-results
publishLocation: "pipeline"
condition: succeededOrFailed()
- job: Chromatic
dependsOn: Playwright
displayName: "Run Chromatic"
variables:
npm_config_cache: $(Pipeline.Workspace)/.npm
steps:
- checkout: self
displayName: "Get Full Git History"
fetchDepth: 0
- task: UseNode@1
displayName: "Install Node.js"
inputs:
version: "24.20.0"
- task: Cache@2
displayName: "Install and cache dependencies"
inputs:
key: 'npm | "$(Agent.OS)" | package-lock.json'
restoreKeys: |
npm | "$(Agent.OS)"
path: $(npm_config_cache)
- script: npm ci
condition: ne(variables.CACHE_RESTORED, 'true')
- task: DownloadPipelineArtifact@2
inputs:
buildType: "current"
artifactName: "test-results"
targetPath: "$(System.DefaultWorkingDirectory)/test-results"
- task: CmdLine@2
displayName: "Run Chromatic"
inputs:
script: npx chromatic --playwright
env:
CHROMATIC_PROJECT_TOKEN: $(CHROMATIC_PROJECT_TOKEN)
CHROMATIC_ARCHIVE_LOCATION: "test-results"trigger:
- main
pool:
vmImage: 'ubuntu-latest'
stages:
- stage: UI_Tests
displayName: "UI Tests"
jobs:
- job: Cypress
displayName: "Run Cypress"
container: cypress/browsers:node-24.20.0-chrome-152.0.7977.64-1-ff-155.0-edge-152.0.4191.53-1
variables:
npm_config_cache: $(Pipeline.Workspace)/.npm
steps:
- checkout: self
displayName: "Get Full Git History"
fetchDepth: 0
- task: UseNode@1
displayName: "Install Node.js"
inputs:
version: "24.20.0"
- task: Cache@2
displayName: "Install and cache dependencies"
inputs:
key: 'npm | "$(Agent.OS)" | package-lock.json'
restoreKeys: |
npm | "$(Agent.OS)"
path: $(npm_config_cache)
- script: npm ci
condition: ne(variables.CACHE_RESTORED, 'true')
- task: CmdLine@2
displayName: "Run Cypress tests"
inputs:
script: |
npm run dev &
npx cypress run
env:
ELECTRON_EXTRA_LAUNCH_ARGS: --remote-debugging-port=9222
- task: PublishPipelineArtifact@1
inputs:
# Chromatic automatically defaults to the cypress/downloads directory.
# Replace with the path to your custom directory and adjust the CHROMATIC_ARCHIVE_LOCATION environment variable accordingly.
targetPath: cypress/downloads
artifact: test-results
publishLocation: "pipeline"
condition: succeededOrFailed()
- job: Chromatic
dependsOn: Cypress
displayName: "Run Chromatic"
variables:
npm_config_cache: $(Pipeline.Workspace)/.npm
steps:
- checkout: self
displayName: "Get Full Git History"
fetchDepth: 0
- task: UseNode@1
displayName: "Install Node.js"
inputs:
version: "24.20.0"
- task: Cache@2
displayName: "Install and cache dependencies"
inputs:
key: 'npm | "$(Agent.OS)" | package-lock.json'
restoreKeys: |
npm | "$(Agent.OS)"
path: $(npm_config_cache)
- script: npm ci
condition: ne(variables.CACHE_RESTORED, 'true')
- task: DownloadPipelineArtifact@2
inputs:
buildType: "current"
artifactName: "test-results"
targetPath: "$(System.DefaultWorkingDirectory)/cypress/downloads"
- task: CmdLine@2
displayName: "Run Chromatic"
inputs:
script: npx chromatic --cypress
env:
CHROMATIC_PROJECT_TOKEN: $(CHROMATIC_PROJECT_TOKEN)
CHROMATIC_ARCHIVE_LOCATION: "cypress/downloads"We recommend saving the project token as a secret environment variable named CHROMATIC_PROJECT_TOKEN for security reasons. In your Azure pipeline configuration, forward it using the env option. When the Chromatic CLI is executed, it will read the environment variable automatically without any additional flags. Refer to the official Azure environment variables documentation to learn more about it.
Run Chromatic on specific branches
If you need to customize your workflow to run Chromatic on specific branches, adjust your pipeline like so:
# 👇 Event to trigger pipeline execution
trigger:
  branches:
    include:
      - main # 👈 Filters the execution to run only on the main branch
    exclude:
      - example

# 👇 Configures pipeline execution on pull requests
pr:
  branches:
    include:
      - main # 👈 Filters the execution to run only on the pull requests for the main branch
    exclude:
      - example
# Additional pipeline configurations
Read the official Azure conditional pipeline documentation.
Now your pipeline will only run Chromatic in the main branch.
Run Chromatic on large projects
Chromatic is prepared to handle large file uploads (with a limit of 5000 files, including stories and assets). If your project exceeds this limit, we recommend adjusting your pipeline and run the chromatic command with the --zip flag to compress your build before uploading it. For example:
# Other configurations

# Pipeline stages
stages:
  - stage: UI_Tests
    displayName: 'UI Tests'
    # Job list
    jobs:
      - job: Chromatic
        displayName: 'Run Chromatic'
        steps:
          # Other steps in the pipeline

          # 👇 Adds Chromatic as a step in the pipeline
          - task: CmdLine@2
            displayName: 'Run Chromatic'
            inputs:
              # 👇 Runs Chromatic with the flag to compress the build output.
              script: npx chromatic --zip
            env:
              CHROMATIC_PROJECT_TOKEN: $(CHROMATIC_PROJECT_TOKEN)
Run Chromatic on monorepos
Chromatic can be run on monorepos that have multiple subprojects. Each subproject will need its own project token set as an environment variable.
Prerequisites
- Ensure that you’re in the correct working directory for the subproject.
- Have
build-storybooknpm script in the subproject’spackage.jsonfile OR explicitly name the script using the--build-script-nameCLI flag and make sure the script is listed in the subproject’spackage.jsonfile.
If you’ve already built your Storybook in a separate CI step, you can adjust your workflow to include the --storybook-build-dir CLI flag to point to the build output directory.
# Other configurations

# Pipeline stages
stages:
  - stage: UI_Tests
    displayName: 'UI Tests'

    # 👇 Adds Chromatic as a step in the pipeline
    jobs:
      # 👇 Runs Chromatic sequentially for each monorepo subproject.
      - job: Chromatic_Deploy_1
        displayName: 'Publish Project 1 to Chromatic'
        steps:
          # Other steps in the pipeline
          - task: CmdLine@2
            displayName: 'Publish Project 1 to Chromatic'
            inputs:
              script: cd packages/project_1 && npx chromatic
            env:
              CHROMATIC_PROJECT_TOKEN: $(CHROMATIC_PROJECT_TOKEN_1)
      - job: Chromatic_Deploy_2
        displayName: 'Publish Project 2 to Chromatic'
        steps:
          # Other steps in the pipeline
          - task: CmdLine@2
            displayName: 'Publish Project 2 to Chromatic'
            inputs:
              script: cd packages/project_2 && npx chromatic
            env:
              CHROMATIC_PROJECT_TOKEN: $(CHROMATIC_PROJECT_TOKEN_2)
Additional paralellization can be achieved when configuring your workflow to run Chromatic on multiple subprojects. Read the official Azure DevOps documentation.
Enable TurboSnap
TurboSnap is an advanced Chromatic feature implemented to improve the build time for large projects, disabled by default once you add Chromatic to your CI environment. To enable it, you’ll need to adjust your existing workflow and run the chromatic command with the --only-changed flag as follows:
# Other configurations

# Pipeline stages
stages:
  - stage: UI_Tests
    displayName: 'UI Tests'
    # Job list
    jobs:
      - job: Chromatic_Deploy
        displayName: 'Run Chromatic'
        steps:
          # Other steps in the pipeline

          # 👇 Adds Chromatic as a step in the pipeline
          - task: CmdLine@2
            displayName: 'Run Chromatic'
            inputs:
              # 👇 Enables Chromatic's TurboSnap feature.
              script: npx chromatic --only-changed
            env:
              CHROMATIC_PROJECT_TOKEN: $(CHROMATIC_PROJECT_TOKEN)
TurboSnap is highly customizable and can be configured to fit your requirements. For more information, read our documentation.
Overriding Chromatic’s branch detection
If your Azure pipeline includes a set of rules for branches (e.g., renames the branch, creates ephemeral, or temporary branches) it can lead to unforeseen build errors.
In this case, you can adjust your workflow and include the --branch-name flag. This flag overrides Chromatic’s default branch detection in favor of the specified branch:
# Other configurations

# Pipeline stages
stages:
  - stage: UI_Tests
    displayName: 'UI Tests'
    # Job list
    jobs:
      - job: Chromatic
        displayName: Run Chromatic
        steps:
          # Other steps in the pipeline

          # 👇 Adds Chromatic as a step in the pipeline
          - task: CmdLine@2
            displayName: Run Chromatic
            inputs:
              # 👇 Runs Chromatic with the --branch-name flag to override the baseline branch
              script: npx chromatic --branch-name=${YOUR_BRANCH}
            env:
              CHROMATIC_PROJECT_TOKEN: $(CHROMATIC_PROJECT_TOKEN)
Chromatic will now detect the correct branch and run your workflow. You can also apply this when fixing cross-fork UI comparisons.
UI Test and UI Review
UI Tests and UI Review rely on branch and baseline detection to keep track of snapshots. We recommend the following configuration.
Command exit code for “required” checks
If you are using pull request statuses as required checks before merging, you may not want your pipeline to fail if test snapshots render without errors (but with changes). To achieve this, pass the flag --exit-zero-on-changes to the chromatic command, and your step will continue in such cases. For example:
# Other configurations

# Pipeline stages
stages:
  - stage: UI_Tests
    displayName: 'UI Tests'
    # Job list
    jobs:
      - job: Chromatic
        displayName: 'Run Chromatic'
        steps:
          # Other steps in the pipeline

          # 👇 Adds Chromatic as a step in the pipeline
          - task: CmdLine@2
            displayName: 'Run Chromatic'
            inputs:
              #👇Runs Chromatic with the flag to prevent pipeline failure
              script: npx chromatic --exit-zero-on-changes
            env:
              CHROMATIC_PROJECT_TOKEN: $(CHROMATIC_PROJECT_TOKEN)
Read our configuration reference documentation.
When using --exit-zero-on-changes your pipeline execution still stop and fail if your Storybook contains stories that error. If you’d prefer Chromatic never to block your pipeline, you can use npx chromatic || true.
Re-run failed builds after verifying UI test results
Builds that contain visual changes need to be verified. They will fail if you are not using --exit-zero-on-changes. Once you accept all the changes, re-run the pipeline and the Run Chromatic step will pass.
If you deny any change, you will need to make the necessary code changes to fix the test (and thus start a new build) to get Chromatic to pass again.
Maintain a clean “main” branch
A clean main branch is a development best practice and highly recommended for Chromatic. This means testing your main branch to ensure builds are passing. It’s important to note that baselines will not persist through branching and merging unless you test your main branch.
If the builds are a result of direct commits to main, you will need to accept changes to keep the main branch clean. If they’re merged from feature-branches, you will need to make sure those branches are passing before you merge into main.
Azure squash/rebase merge and the “main” branch
Azure’s squash/rebase merge functionality creates new commits that have no association to the branch being merged. If you are already using this option, then we will automatically detect this situation and bring baselines over (see Branching and Baselines for more details).
If you’re using this functionality but notice the incoming changes were not accepted as baselines in Chromatic, then you’ll need to adjust the pipeline and include the --auto-accept-changes flag. For example:
# Other configurations

# Pipeline stages
stages:
  - stage: UI_Tests
    displayName: 'UI Tests'
    # Job list
    jobs:
      - job: Chromatic
        displayName: 'Run Chromatic'
        steps:
          # Other steps in the pipeline

          # 👇 Checks if the branch is main and runs Chromatic with the flag to accept all changes.
          - task: CmdLine@2
            displayName: 'Run Chromatic and auto accept changes'
            condition: and(succeeded(), eq(variables['build.sourceBranch'], 'refs/heads/main'))
            inputs:
              script: npx chromatic --auto-accept-changes
            env:
              CHROMATIC_PROJECT_TOKEN: $(CHROMATIC_PROJECT_TOKEN)
            # 👇 Checks if the branch is not main and runs Chromatic
          - task: CmdLine@2
            displayName: 'Run Chromatic'
            condition: eq(variables['Build.Reason'], 'PullRequest')
            inputs:
              script: npx chromatic
            env:
              CHROMATIC_PROJECT_TOKEN: $(CHROMATIC_PROJECT_TOKEN)
Read our configuration reference documentation.
Including the --auto-accept-changes flag ensures all incoming changes will be accepted as baselines. Additionally, you’ll maintain a clean main branch.
If you want to test the changes introduced by the rebased branch, you can adjust your workflow and include a new step with the ignore-last-build-on-branch flag. For example:
# Other configurations

# Pipeline stages
stages:
  - stage: UI_Tests
    displayName: 'UI Tests'
    # Job list
    jobs:
      - job: Chromatic
        displayName: 'Run Chromatic'
        steps:
          # Other steps in the pipeline

          # 👇 Option to skip the last build on target branch
          - task: CmdLine@2
            displayName: 'Run Chromatic'
            inputs:
              script: npx chromatic --ignore-last-build-on-branch=my-branch
            env:
              CHROMATIC_PROJECT_TOKEN: $(CHROMATIC_PROJECT_TOKEN)
Read our configuration reference documentation.
Including the --ignore-last-build-on-branch flag ensures the latest build for the specific branch is not used as a baseline.
Run Chromatic on external forks of open source projects
You can enable PR checks for external forks by sharing your project token where you configured the Chromatic command (often in package.json or in the pipeline step).
Sharing project tokens allows contributors and others to run Chromatic builds on your project, which can use snapshots. They cannot access your account, settings, or accept baselines. This can be an acceptable tradeoff for open source projects that value community contributions.
Skipping builds for certain branches
Sometimes you might want to skip running a build for a certain branch, but still have Chromatic mark the latest commit on that branch as “passed”. Otherwise pull requests could be blocked due to required checks that remain pending. To avoid this issue, you can run chromatic with the --skip flag. This flag accepts a branch name or glob pattern.
One use case for this feature is skipping builds for branches created by a bot. For instance, Renovate automatically updates a projects dependencies. Although some dependencies can result in UI changes, you might not find it worthwhile to run Chromatic for every single dependency update. Instead, you could rely on Chromatic running against the main or develop branch.
To skip builds for renovate branches, use the following:
npx chromatic --skip 'renovate/**'Read our configuration reference documentation.
To apply this to multiple branches, use an “extended glob”. See the globs guide for details.
npx chromatic --skip '@(renovate/**|your-custom-branch/**)'Pull request status checks
Chromatic can post commit status checks to pull requests in Azure Repos. Unlike GitHub, GitLab, and Bitbucket, Azure DevOps isn’t a sign-in provider. Instead, you connect a Chromatic project to an Azure repository with a personal access token (PAT).
ℹ️ Azure DevOps status checks are available on the Enterprise plan. Contact support to enable them for your account.
Before you begin
- A Chromatic project that isn’t linked to another Git provider
- An Azure DevOps repository with your project’s code
- An Azure DevOps personal access token with the Code (Read) and Code (Status) scopes
Link your Chromatic project to Azure DevOps
-
In your Chromatic project, go to Manage and open the Configure tab.
-
Scroll down to the Connected applications section and choose to link an Azure DevOps repository.
-
Enter your Azure DevOps Organization name, Project name, and Repository name. In a basic setup, the project and repository names are the same, but an Azure DevOps project can contain multiple repositories.
-
Paste your personal access token in the Access token field and click Add Azure DevOps.
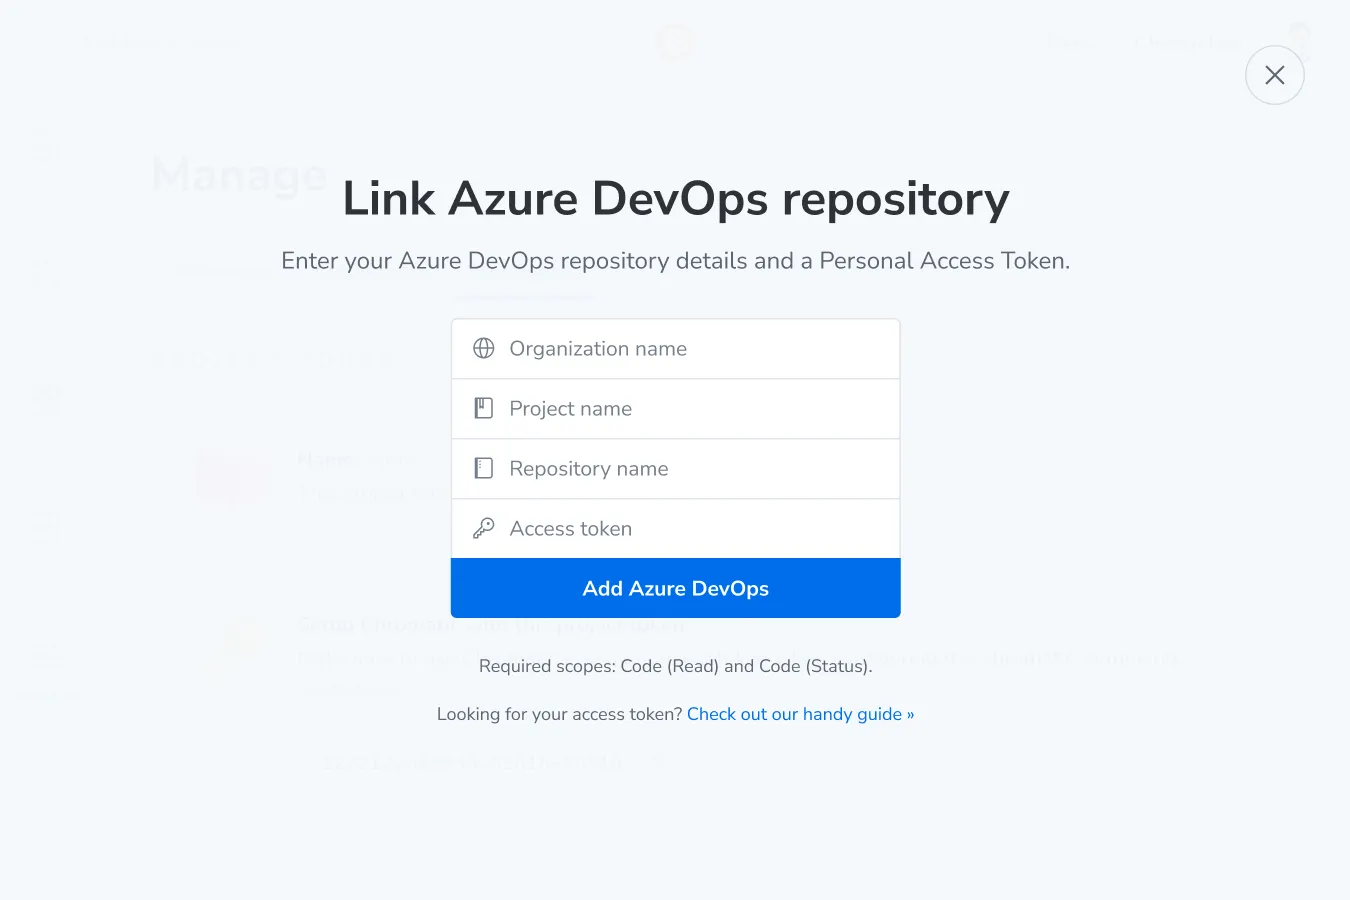
If the token is valid, the dialog closes and the repository is linked. Otherwise, Chromatic shows an error on the token field.
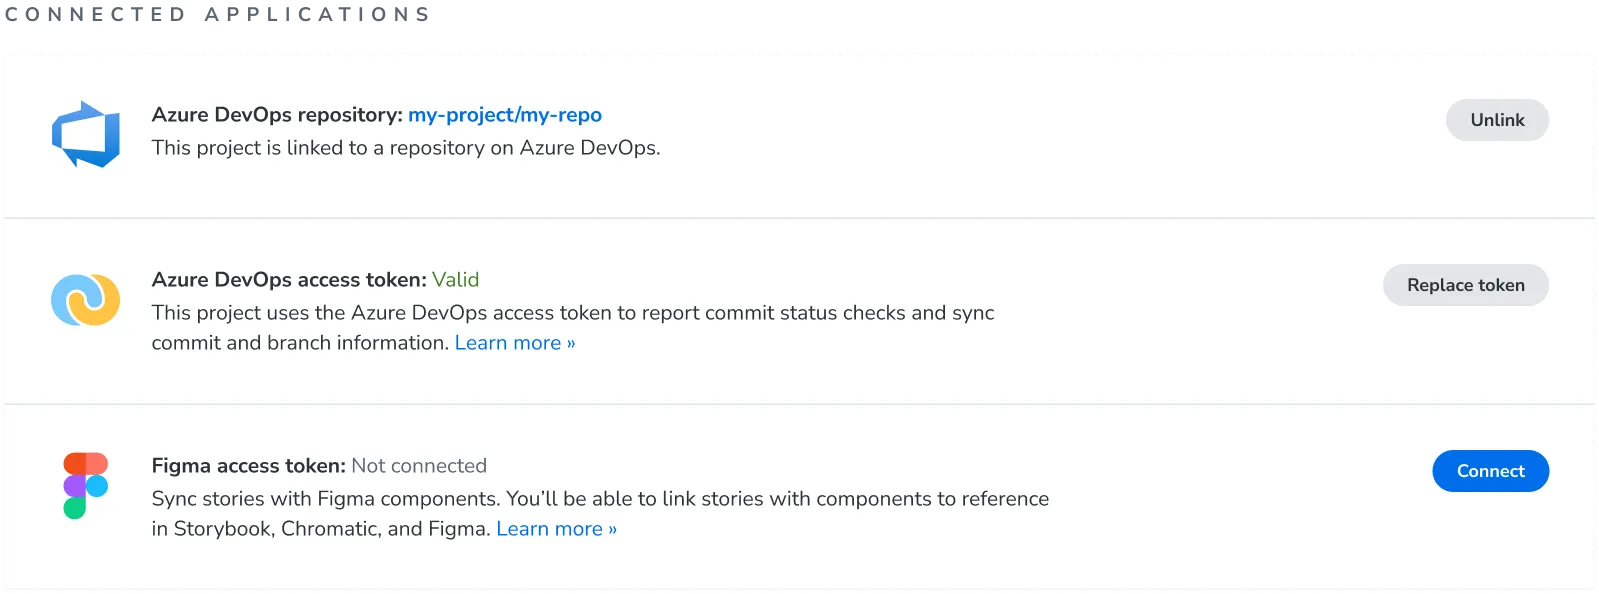
Once linked, the Connected applications section shows your Azure DevOps repository and the status of its access token.
Replace an expired or invalid token
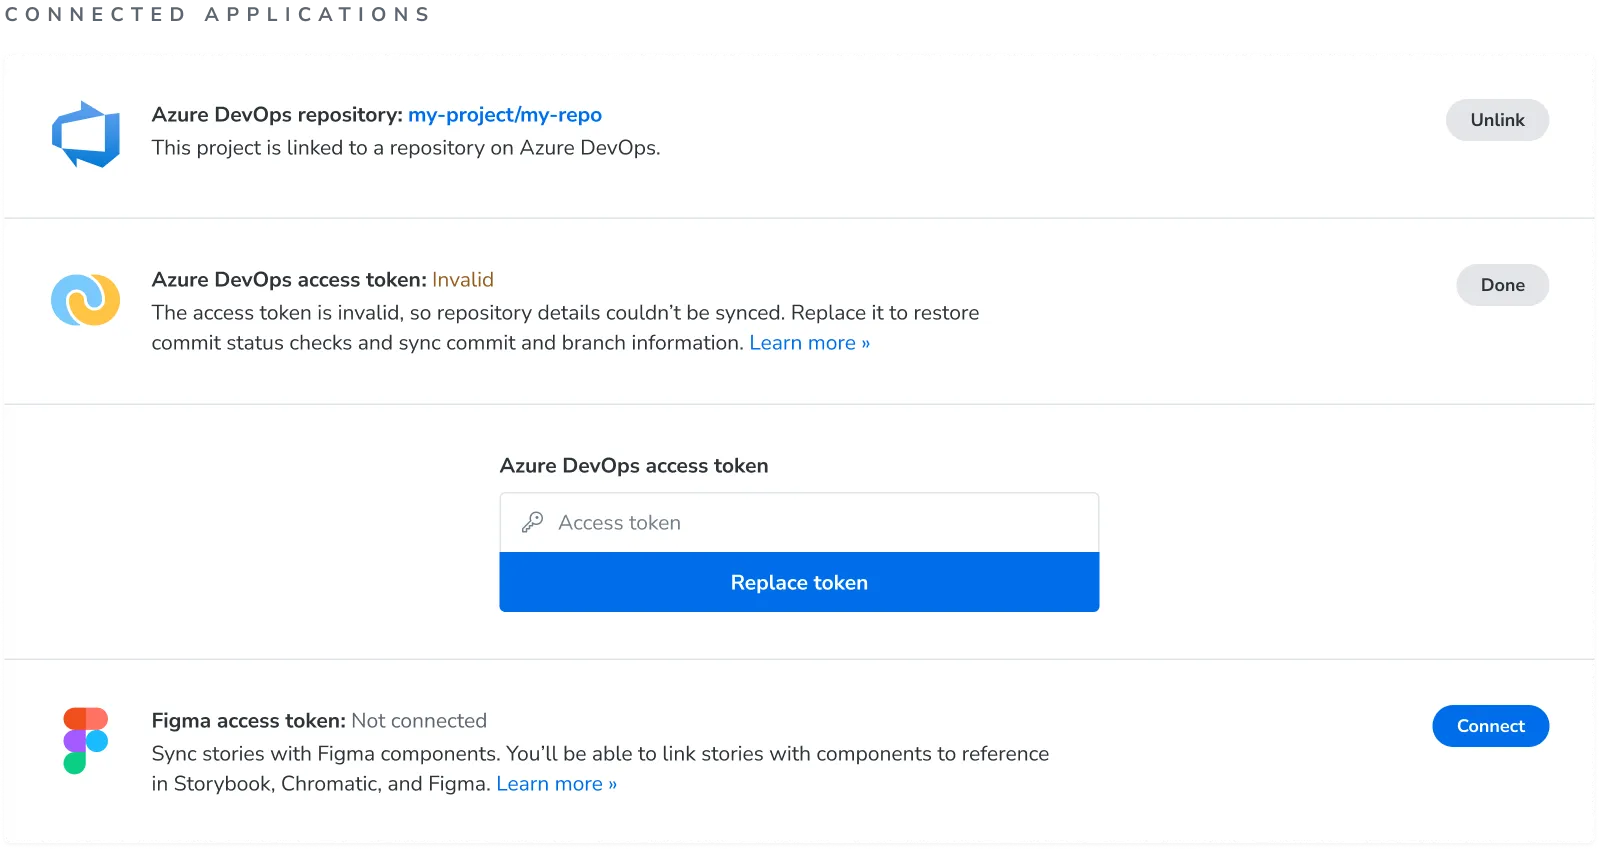
If your personal access token expires or is revoked, Chromatic marks it as Invalid and stops reporting commit status checks. To restore them:
- Create a new personal access token in Azure DevOps with the Code (Read) and Code (Status) scopes.
- In your Chromatic project, go to Manage » Configure » Connected applications.
- Next to Azure DevOps access token, click Replace token.
- Paste the new token and click Replace token.
Run Chromatic in Azure Pipelines
Before Azure DevOps can require the Chromatic status, Chromatic needs to report it at least once. Set up a pipeline that runs Chromatic on pull requests:
- Commit a pipeline YAML file that runs Chromatic to your repository’s default branch. See Setup for an example.
- In your Azure DevOps project, go to Pipelines and click New pipeline.
- Select Azure Repos Git, then select your repository.
- Select Existing Azure Pipelines YAML file, then choose the branch and path of the file you committed.
- Click Variables and add a secret variable named
CHROMATIC_PROJECT_TOKENwith your Chromatic project token. - Run the pipeline manually and confirm the build succeeds.
Run the pipeline on every pull request
- In your Azure DevOps project, go to Project settings » Repositories and select your repository.
- Open the Policies tab and, under Branch Policies, select your default branch.
- Add a Build Validation policy and select the pipeline you just ran.
- Set the trigger to Automatic, the policy requirement to Required, and the build expiration to Never.
Require the Chromatic status check
- Open a pull request against your default branch. The pipeline will queue automatically.
- Wait for the pipeline to finish. Chromatic’s statuses (for example,
chromatic/UI Tests) appear on the pull request, but they don’t block merging yet. - Go back to Project settings » Repositories » your repository » Policies, and select your default branch under Branch Policies.
- Add a Status Check policy and choose the Chromatic status (for example,
chromatic/UI Tests) from the Status to check dropdown. - Set the policy requirement to Required.
Now, pull requests into that branch can’t be merged until the Chromatic status passes. Existing pull requests, including the one you used to report the first status, pick up the policy without any changes.
Azure Pipelines can take several minutes to start a queued run. If the Chromatic status doesn’t appear right away, check the pipeline queue before troubleshooting.
Troubleshooting
Why don’t Azure Pipelines fetch the complete git history even when fetchDepth: 0 is set?
Setting fetchDepth: 0 means “don’t apply depth limits to git operations,” but it doesn’t ensure the repository isn’t already shallow. The git history may be shallow for the following reasons:
-
Initial cloning with
--depth=1(single commit) occurs regardless offetchDepth: 0. ThefetchDepthsetting applies to subsequent fetches, not the initial clone. This typically happens when using self-hosted agents with workspace reuse. -
Cached shallow workspace – if a previous pipeline used shallow cloning, the cached workspace might already be shallow. New pipelines checking out to the same workspace inherit the shallow state.
-
Persistent shallow configuration – the
.git/shallowfile persists in the workspace, and subsequent operations remain limited by it.
How to resolve this:
1. Using git fetch --unshallow
steps:
  - checkout: self
    fetchDepth: 0 # Still recommended

  - script: | # Fetch complete history
      git fetch --unshallow
    displayName: 'Fetch complete history'
2. Clean workspace strategy
resources:
  repositories:
    - repository: self
      fetchDepth: 0

jobs:
  - job: build
    workspace:
      clean: all # Forces fresh clone